Sunday, February 13, 2011

Neck Block Carbon Fiber & Initial Tapering of the Neck


The neck block has been bonded and fared in as well as laminated with unidirectional carbon fiber. The carbon fiber runs across the grain of the wood which adds strength and stability to the neck joint. The neck block is spread out wide and looks rather large but one must remember that the guitar rim is rounded over - so, the neck block is actually equal to that of an average guitar. But, because it's long and spreads out, I feel, with regards to the guitars tone and performance, the result will be better sustain and feedback control. It should also be noted that the neck block wood is now completely entombed away from the effects of environmental changes. The neck pocket that will later be routed and bonded in is also made with carbon fiber with the strength going across the wood grain - once again to maximize strength and eliminate the chance of the quarter sawn neck block wood from splitting.

Strength, stability, performance and reliability.

Tuesday, February 8, 2011

Wednesday, February 2, 2011

The Carbon Fiber, Neck Block, Neck Pieces and Top Wood


The inside of the rim has been fared smooth with an 80 grit sanding ball in preparation for the first layer of Carbon. Just before I laminate in the Carbon fiber I take my thickness gauge and measure the rim's thickness to see if there are any anomalies. This helps me determine how thick the carbon fiber actually is after its laid down. When I do my final shaping I then know exactly how much wood I have to play with and I eliminate the chances of blindly going along and risking sanding through the wood and exposing the carbon fiber.

The neck block is fashioned out in 1" thick pieces of quarter sawn Basswood. Each piece is scribed into the neck area separately and then they are glued together as one - in this case 5 pieces were used to create a nice spread out neck block. By increasing the mass in this area of the guitar it will give me the surface area needed for a stable joint and it also tapers beautifully back into the sides. The neck block will be laminated with Carbon Fiber across the grain to assure maximum strength and stability. My neck blocks are carved and in this case I went with an Art Deco inspired winged shaped. By adding more curves to the neck block I increase the effect of the strength of the Carbon Fiber. A curved wall is stronger than one that is not.

The neck pieces have been cut out. It will be my standard nine lamination design - 5 of wood and four of Carbon Fiber. The middle piece is blond flame maple and it has been tapered to match the neck shape. The rate of taper matches the neck thickness taper and the same taper will be reflected in the peghead. These little area of detail are what separate guitars from one another - attention to detail and a well thought out aesthetic are just as paramount as the function. Form and function should always be seamlessly fused.

The top wood for this axe will be carved from a beautiful piece of Ancient Kauri wood from New Zealand. The wood was found by Kiwi farmers while they were plowing their fields. They unearthed these massive trees from an ancient bog where oxygen did not exist. They had the trees carbon dated at 50, 000 years old! They were naturally knocked down in the last ice age and the wood predates the Wholly Mammoth by 10, 000 years - lots of mojo in this stuff! The wood is figured and they refer to the figure as whitebait. The story is that when the trees were underwater these little schools of fish would be constantly swimming overhead and interrupting the sunlight which in turn created the phenomenon in the wood. This is the same legend like story of bearclaw spruce - that the figure in the wood was created by a bear clawing at the tree. I love wood.

Sunday, January 30, 2011


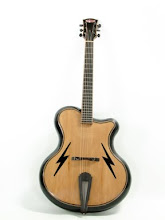
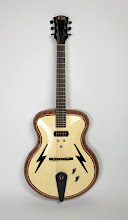
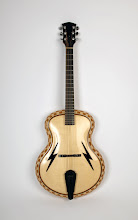
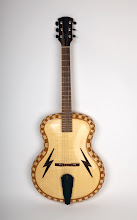
The newest Dagmar Custom Guitar has begun. This is the most complicated pattern to date and was inspired by my clients. Their request was for a sharks tooth pattern as depicted by a sketch that they sent. At first I thought no, it can't be done. But I couldn't just let the idea go. I became obsessed and began to sacrifice sleep to see at least how close I could come to the original sketch using my construction methods. I sat in my shop, hovered over my bench and began to draft out the intended double cutaway body shape. A tooth pattern? How in the heck do I do that?

With some practical drafting I had a eureka moment and was able to come up with a fairly close derivative of the client's sketch. The key to figuring it out was to have two constants. The teeth had to be the same all the way around and the pattern would have to be at a constant interval around the perimeter of the sound plates. So, in comparison to all the guitars before, I was able to see that the rim would have to be figured out using the inside perimeter as the reference point vs the out side perimeter. I had to double the amount of segments and quadruple the angles.

I had just enough left over pieces from Gretchen to do three test segments to help illustrate what the pattern would look like. With the transitioning and connecting radius that make up the rim the space between each tooth would have to expand or shrink to follow the guitar's curves.

This revelation was pretty exciting but I was initially reluctant to say yes to the client. Doubling the cuts and quadrupling the angles means that my tolerances would have to be just that much more tight. However, I felt as if I needed to build this guitar and I became totally inspired by the challenge.

The rim is basically two rims zippered together. The base of each segment is 3/8" and as stated above, each tooth is exactly the same. The dark maple in between is forever changing all the way around. There were times of panic as I was piecing the segments together but I remained in the mind set to go slow and get her done. And suddenly it was. And it worked! And I love it!

I did veer off the drafting a bit from time to time but I was able to back up and correct things. I also tweaked the upper horns of the cutaway. The drafting allowed for 3 teeth in the super tight radius and it simply did not look right - it looked to spacious. The decision to sneak a 4th tooth in was made. A bit of freestyle math was successfully exercised and the result looks much better.

The next step is to fair the inside concave surface to prep for the carbon fiber inlays. After that I will define the sound plate perimeter and rout in the glue shelf which is the equivalent of a traditional guitar's kerfing.